Recipe: Soft Molasses-Spice Cookies with Cardamom

No photos (yet) for this recipe. My motivation for this experiment was making use of a spice that was new to me: cardamom.

Cardamom

A couple of weeks back, on the recommendation of a friend of ours who’s a professional chef, I picked up some ground cardamom (alt: cardamon) for baking. I’m unfamiliar with this spice and had never used it before this recipe.

It’s intensely fragrant; even closed, the small baggie of loose cardamom I bought at the Flatbush Food Co-op has been perfuming our kitchen and dining room. It smells like Christmas gingerbread. The scent has strong citrus tones, and at first I thought it might be in the Rutaceae, the Citrus family. But it comes from the Zingiberaceae, the Ginger family, which also makes sense.

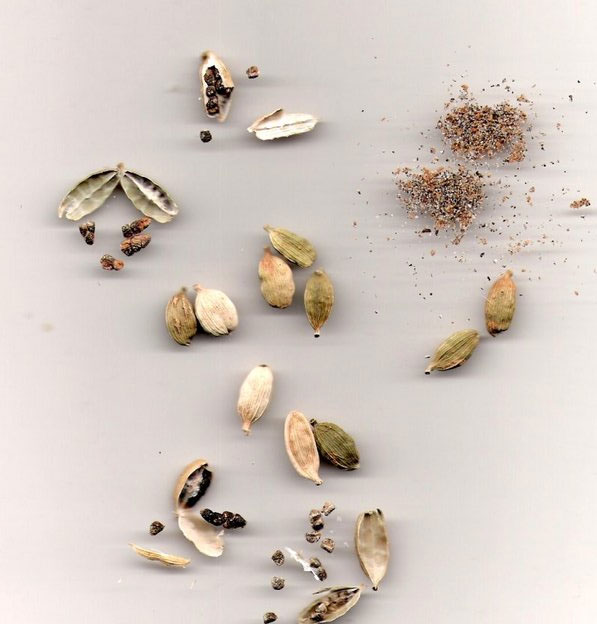
The plant is Elettaria cardamomum, a mono-specific genus native to a wide range in southeast Asia. (Some authorities separate the Sri Lankan population as its own species.) The fruit is a pod, a capsule containing multiple seeds. The spice is made from the ground seeds.

Credit: JoJan (Wikimedia Commons)
Cardamom fruit, seeds, and ground spice

Elettaria cardamomum under cultivation. Credit: Rhaessner (Wikimedia Commons)
Elettaria cardamom under cultivation

Searching for recipes on the Web, I found that cardamom is a common ingredient in many recipes from Nordic countries. I’m not familiar with Nordic cuisine, so I wouldn’t be able to judge so well the success of my baking endeavor. Cardamom also shows up in many gingerbread recipes, so I fell back on something more familiar to me to try out: molasses spice cookies. Once again, King Arthur Flour provided the basic recipe which I tweaked to make use of my available ingredients.

Ingredients

KAF provides weight equivalents for the volume measures in many of their recipes. I use a kitchen scale and weigh bulk ingredients like sugar and flour whenever possible. It’s much faster, more accurate, and leads to more consistent results. It also reduces cleanup, since fewer measuring cups are involved! This is especially convenient for liquid or sticky ingredients like the molasses in this recipe.

I used whole wheat flour instead of all-purpose, sifting it and leaving out the coarsest remaining bran to give it a finer texture. Since I had “robust” molasses, and I was using whole wheat flour, I increased the total amount of spices. I also added vanilla, allspice, and of course cardamom, none of which were in the original recipe. This created a complex taste, where none of the flavors overwhelm, but I think I would miss any I left out.

Yield: About four dozen (48) cookies

  • 2 sticks (1 cup, 8 ounces) unsalted butter
  • 7 ounces (1 cup) sugar
  • 6-1/4 ounces (a little more than 1/2 cup) molasses, robust flavor. (6 ounces would have been 1/2 cup.; the extra 1/4 ounce was a mistake on my part, but I recorded it as what I did.)
  • 2-1/4 teaspoons baking soda
  • 1 teaspoon salt
  • 1 teaspoon cinnamon
  • 1 teaspoon cloves
  • 1 teaspoon ginger
  • 1 teaspoon allspice
  • 1 teaspoon cardamom
  • 2 teaspoons vanilla extract
  • 2 extra large eggs (original called for large)
  • 14 ounces whole wheat flour (not sure of the volume equivalent)
  • sugar, for coating (This gives the outside of the cookies some crunch. The recipe calls for coarse or even pearl sugar, for more crunch. I’d use them instead if I had them.)

Preparation

  1. Let the butter come to room temperature, if possible, for easier creaming.
  2. Preheat the oven to 350F. (Be sure you have an accurate oven thermometer! I had a devil of a time baking in our horrible kitchen until I bought a thermometer and discovered that the oven dial was off by 100F!)
  3. Prepare a small bowl with some of the sugar for coating the cookies.
  4. (The recipe calls for greasing baking sheets or lining them with parchment. Since I have some well-seasoned, non-stick baking sheets, I didn’t bother and it wasn’t necessary.)

Mixing

  1. Cream together the butter and sugar until they’re light and fluffy.
  2. Beat in the the molasses, salt, and spices. (Here’s where you can taste-test to adjust if needed. I added the spices at 1/4 or 1/2 teaspoon at a time to make sure I didn’t over do it. I ended up with 1 teaspoon of each, as listed above.)
  3. Beat in the baking soda.
  4. Add the eggs one at a time, beating until they’re mixed well into the batter. Scrape down the sides of the bowl and the beaters and mix well.
  5. Slowly stir in the flour. (This is something I’ve learned recently. Stirring the flour in at low speeds keeps the cookies tender. Beating the flour in at higher speeds makes the cookies tougher.) Scrape down the sides of the bowl and the beaters and mix well.

This is a fairly soft, wet dough. Although I didn’t try it this time, I bet you could refrigerate the dough for a few hours, or even overnight, to set up before baking.

Baking

  1. Using a tablespoon cookie/ice-cream scoop, create a small ball of the dough. (A scoop is the fastest, easiest way to get a consistently sized, professional looking, batch of cookies. You could also just use two tablespoons.)
  2. Drop the dough ball onto the coating sugar. Coat thoroughly.
  3. Place the coated dough ball on the baking pan. Space them evenly, and leave plenty of space for them to spread. (The recipe says leave 2-1/2″ between them, which sounds about right.)
  4. Bake for at least 10, at most 11, minutes at 350F. (With experience, your nose and eyes are the best guides here. When they smell like they’re just starting to burn, and the edges are visibly just darker than the center, they’re done.)
  5. Remove the pan and let it cool for 5-10 minutes.
  6. Move the cookies to a wire rack to cool completely. (But try at least one with a glass of cold milk while it’s still warm!)

Related Posts

Other recipes on this blog

Links

Soft Ginger-Molasses Cookies and Ginger Syrup, Recipes, King Arthur Flour

Stand Still / Dona Nobis Pacem

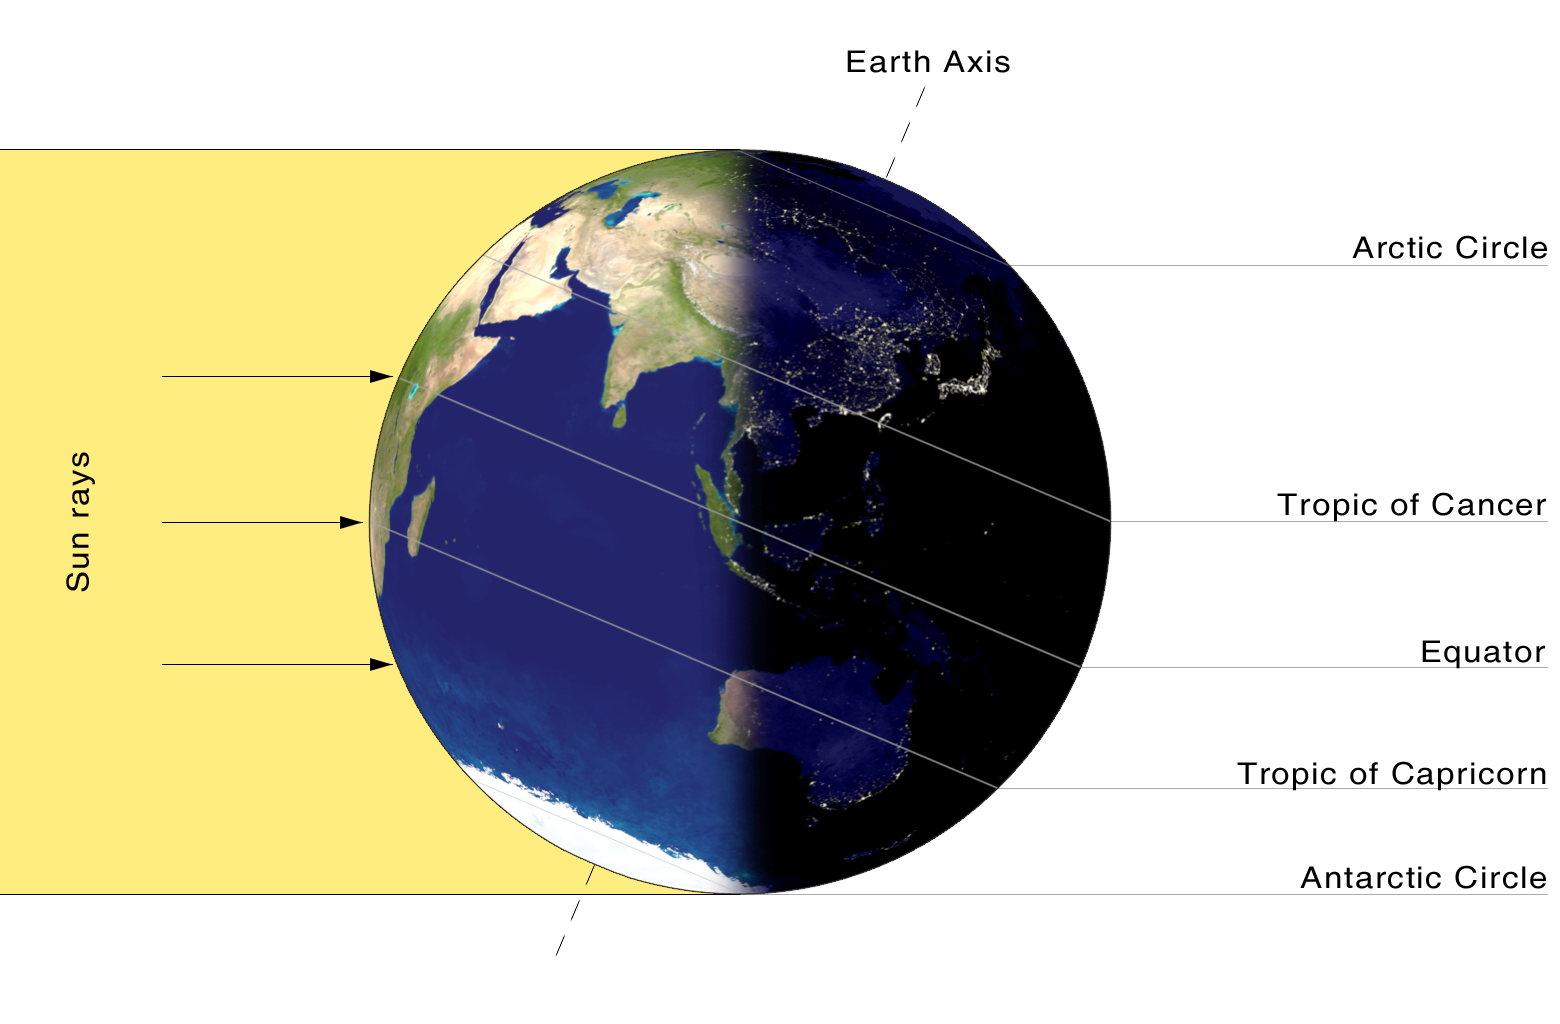
Illumination of Earth by Sun at the southern solstice.

It’s the longest night and shortest day of the year for my half of the world. This season’s Solstice (Winter in the Northern hemisphere, Summer in the Southern), occurred at 12:04pm UTC on December 21, 2008. That was 7:04 AM Eastern Time, my time zone, about six hours ago.

The name is derived from the Latin sol (sun) and sistere (to stand still), because at the solstices, the Sun stands still in declination; that is, its apparent movement north or south comes to a standstill.
Solstice, Wikipedia

It feels like winter. It’s cold outside, icy and frozen over the layer of snow we got on Friday. We will get a deep freeze tonight.

Later this week, I will see what’s left of my family of origin for the first time since we flew back from North Carolina a little more than two weeks ago. It feels like it’s been much longer than that. It will be a bittersweet reunion. We are incomplete for the first time, and for all the seasons to come.

The days start getting longer again, earlier sunrise, later dusk. It feels like more than a metaphor this year.

Lots of “it feels”, which really means, “I’m feeling.” Sometimes that’s the work to be done. To stand still. And simply feel.

If, like me, you can’t read music cold, this page has a little MIDI file which bangs out the tune so you can follow the score.

Related Posts

2007 December (Winter) Solstice

Links

Solstice (Wikipedia)

Happy Holidays

The MTA thwarted our plans to attend a concert of a women’s choir this evening. So Blog Widow and I turned back and walked around our neighborhood, taking in the snow-beings and holiday lights.

Enjoy this slideshow of my Flickr set of photos from the evening. For best viewing, click the play button, then click the icon with four arrows in the lower-right to view it full-screen on a black background.

Related Content

Flickr set

Winter Storm Watch

A Winter Storm Watch is in effect for Brooklyn and the south shore of Long Island for tomorrow, with the possibility of 6 or more inches of snow:

THE NATIONAL WEATHER SERVICE IN UPTON [New York] HAS ISSUED A WINTER STORM WATCH…WHICH IS IN EFFECT FROM FRIDAY MORNING THROUGH FRIDAY EVENING.

SNOW IS EXPECTED TO OVERSPREAD THE REGION FRIDAY MORNING…AND COULD BECOME HEAVY AT TIMES IN THE AFTERNOON. THE SNOW MAY MIX WITH SLEET AND RAIN IN THE AFTERNOON…ESPECIALLY ALONG THE SOUTH SHORE OF LONG ISLAND. THERE IS THE POTENTIAL FOR SNOWFALL ACCUMULATIONS OF 6 OR MORE INCHES.


“Proud to be from … somewhere … over there …”

Update: Yup, the Eagle corrected the opening paragraph! Guccione was now “born in the Flatbush section of Brooklyn,” intersection unknown …


The Brooklyn Daily Eagle has a daily, On This Day in History, that features different interesting Brooklyn historical events. Today’s historic event is … the birthday of Robert Guccione:

Robert Sabatini Guccione was born on Argyle Road and Flatbush Avenue in the Flatbush section of Brooklyn on December 17, 1930. Bob well remembers his childhood Brooklyn home and is always proud to respond “I’m from Brooklyn,” when asked where he was born.
Proud To Be From Brooklyn, Brooklyn Daily Eagle, 2008.12.17

Okaaaay, except that Argyle Road – aka East 13th Street – and Flatbush Avenue never intersect. They run parallel to each other, nine blocks apart.


View Larger Map

So, proud to be from Brooklyn, sure, maybe even from Flatbush. Just doesn’t remember “his childhood Brooklyn home” as well as he thinks he does.

I notified the Eagle via the email address on their Web site. Hopefully they will correct it soon.

Links

Proud To Be From Brooklyn, Brooklyn Daily Eagle, 2008.12.17

Grief and Baking: Peppermint Swirl Meringue Cookies

2024-12-30: Corrected linkrot. Updated recipe.
2014-12-13: Simplified the baking temperature and time, and added notes about portion sizing.


Yesterday it was hard for me to do anything. Although the weather was perfect – 60s and partly sunny – for planting the bulbs I have yet to get into the ground, I could not bring myself to go outside. It’s only been two weeks since my father died, and I was feeling his absence deeply and sharply yesterday. When I wrote that “there’s so much of him in me,” I didn’t appreciate how much I would feel a loss of my own self, a void left standing where “the library burned down.” It reminds me of the hole in the sky where the twin towers of the World Trade Center once stood. The absence is palpable.

By the end of the day, I was feeling a little better, and I thought that surrendering to my winter baking mode would help. I was prepared to make some basic chocolate chip cookies, but Blog Widow came home with a box of soft, store-bought ones. I experimented with something new, and here’s what I came up with:

Peppermint Swirl Meringue Cookies

I call these Peppermint Swirl Meringue Cookies, an elaboration of a basic meringue recipe from King Arthur Flour. KAF is my favorite source for all things baking. I was happy to find that the Flatbush Food Co-Op carries several varieties of King Arthur Flours in the well-stocked baking section of their new location.

I’ve made meringues many times before, but Blog Widow has never cared for them. He likens their texture to styrofoam, and I can’t disagree. The best way to eat them is not to bite into them. Instead, let them dissolve on the tongue, releasing a burst of the flavoring baked into them.

Part of last night’s experiment was to see if I could achieve a texture that would satisfy Blog Widow: crisp and crunchy on the outside, soft and chewy on the inside. The KAF recipe suggested that I could accomplish this simply by baking them for an hour less than usual. This worked beautifully. Here’s a single, intact meringue cookie, the same one in the center foreground of the photo above:

Meringue Cookie, Intact

And here’s the same cookie broken open (shattered, really!) to show the chewy, slightly gooey, interior:

Meringue Cookie, Broken Open

Perfect. And baking these did help lighten my spirit.

Meringues are more confection than cookie. The basic ingredients are just egg whites and sweeteners: no fat and no cholesterol. Since there’s no flour, they’re also fine for folks avoiding gluten.

I use dried, powdered egg whites in recipes calling for them. I buy egg whites in a carton from the refrigerated egg section of any of my local grocery stores. It saves the hassle of separating them, and I don’t have to figure out what to do with the yolks. Dried egg whites, while shelf-stable, can have an off, eggy taste, so I no longer use them. You want to make sure that the flavoring is assertive enough, without being too aggressive, to balance the recipe.

The classic flavoring is vanilla, but anything can be used. I thought I would make some red and green meringues with different flavorings for each color, such as cinnamon for red, lime for green. But a tip in the KAF recipe suggested coloring just half the mixture and swirling them together. White plus red stripes just screams candy cane, so peppermint was the flavor I went with. (If I had spearmint flavoring, I would also try green and white stripes.)

Here’s how I made the cookies in these photos, presenting the basic KAF recipe with the slight adaptations I had to make along the way. The basic KAF recipe presents lots of possible variations, even adding nuts to the meringue, so check that out for other creative options.

Ingredients

  • Egg whites of 6 large eggs (7/8 cup, or 7-8 ounces), or 1/4 cup dried egg whites dissolved in 3/4 cups water, at room temperature (separate eggs when cold, but whip them at room temperature to get the best volume.)
  • 1/4 teaspoon cream of tartar (a mild acid which helps stabilize the whites when beaten)
  • 1/4 teaspoon salt (for flavor only. You can omit this if you need to minimize sodium, although the egg whites naturally contain sodium of their own.)
  • 1 1/4 cups extra-fine sugar (also known as sanding or castor sugar. I used regular white, refined sugar and they came out fine. A finer grain of sugar dissolves easier in the whites for a smooth, non-gritty texture.)
  • 1 1/2 cups (6 1/4 ounces) confectioner’s sugar (powdered sugar)
  • 1/2 teaspoon peppermint extract
  • 1/4 teaspoon vanilla extract (The vanilla mellows and warms the peppermint, which remains the dominant flavor.)
  • red food coloring (I used a gel type.)

Preparation

  1. Preheat the oven to 200F. (Be sure you have an accurate oven thermometer! Temperature is lower than usual for baking – too high, and you’ll burn, rather than bake, your meringues – and gets reduced further part-way into the baking time. I had a devil of a time baking in our horrible kitchen until I bought a thermometer and discovered that the oven dial was off by 100F!)
  2. Prepare the egg whites and set them aside to let them come to room temperature.
  3. Use the largest baking pans you have, line them with parchment paper, and set them aside. (I could only use two pans in my oven, and had to discard part of my batch because I had no more room for them.)

Mixing

I used a hand whisk for the slow whisking steps, and a mixer with a whisking attachment for the rest.

  1. Sift the sugars together and set them aside.
  2. Add the cream of tartar to the room-temperature egg whites, Whisk until the cream of tartar has completely dissolved and the whites are foamy.
  3. If using salt, add it now and whisk to dissolve that as well.
  4. Increase the whisking speed until the egg whites have doubled in volume.
  5. Add half the sugar and whisk until the whites are glossy and start to get stiff.
  6. Add the remaining sugar and whisk until the whites hold stiff peaks. (Since I didn’t have extra-fine sugar, I chickened out here a little and added the sugar a little early so it would dissolve completely. I also didn’t whisk completely to the hard peak stage. Just the tips of the peaks folded over, which you can see in the finished cookies.)
  7. Add the flavorings.
  8. Remove about 1/3 of the meringue into a separate bowl. Add the coloring and whisk it until it the desired color is evenly distributed.
  9. Add the colored meringue back into the other bowl on top of the white meringue. Using a spatula, gently fold the two meringues together until they are just striped. It only takes a few folds for this.

 Baking

  1. Pre-heat the oven to 200F.
  2. Drop the striped meringue by the spoonful onto the parchment paper on your baking pans. The meringues will not spread while baking, so they can be placed as close as possible without touching each other.
    Use a tablespoon to get 3 dozen big cookies; at this size, though, I usually run out of baking sheet before I run out of batter. Use two teaspoons for more, smaller, cookies; the smaller size can be placed more closely together on the sheet, and uses up all of the batter. The smaller ones are bite-sized and easier to handle.
    You can also use a pastry bag, if you have one, for fancier cookies.
  3. Bake at 200F for 90 minutes, for soft centers, or 2 to 2-1/2 hours for fully baked.
  4. Turn off the heat, crack open the oven door, and let them cool for 30 minutes.
  5. Remove them to a wire rack to cool completely.

Here’s another, close-up view of the finished product.

Peppermint Swirl Meringue Cookies

And oh yeah: Blog Widow labes this a successful experiment!

Related Posts

The quotes in the opening paragraph come from the eulogy I wrote and read for my father’s memorial service on Thursday, December 4, 2008.

Links

Meringues, Recipes, King Arthur Flour

Gardening by Satellite

Here in Brooklyn, at the end of last week and into the weekend, we got drenched with a couple days of rain. Fellow gardeners in Massachusetts, Vermont, New Hampshire, and Maine, I sympathize.

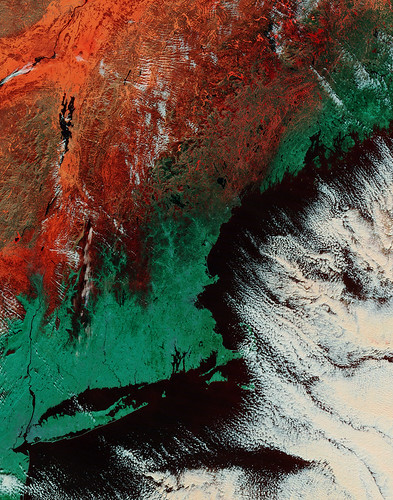
New England Ice Storm, 2008.12.13

In this image, snow is red and orange, while liquid water is black. By the time this image was taken [On December 13], the top layer of ice was undoubtedly starting to melt, and the resulting watery ice ranges from dark red to black. The icy region extends over parts of Massachusetts, Vermont, and New Hampshire … The normally green-blue tone of plant-covered land is nearly black throughout most of New Hampshire, the state most severely affected by the storm.
New England Ice Storm, NASA Earth Observatory

If you’ve blogged about the ice storm in your area, give us a link!

Links

New England Ice Storm, NASA Earth Observatory

The following Garden Bloggers reported on the ice storm where they are.
Common Weeder, Heath, Massachusetts
Garden Path, Scarborough, Maine
The Vermont Gardener, Marshfield, Vermont

ID that tree

A specimen of Abies fraseri, Fraser Fir, decorated as our Christmas/ Winter Holiday Tree for 2007-2008.
Christmas Tree

A reminder that the Brooklyn Botanic Garden has an online guide to identifying the species of your holiday tree.

Most people can tell a Wii from a PS3 in the shop windows at this time of year, but how many can tell whether that’s a Scotch pine or a balsam fir in their living room? Our simplified key will help you identify your holiday tree.
Holiday Tree Identification, Brooklyn Botanic Garden

For example, here are the keys to my annual choice, Abies fraseri, the Fraser Fir:

  • Leaves are needlelike, at least 4 times longer than wide.
  • Needles occur singly, not in clusters.
  • Buds are round or egg-shaped and have blunt tips.
  • Needles are attached directly to the stem.
  • Mature needles are 1/2 to 1 inch long.
  • Twigs have red hairs.

I also learned in my Woody Landscape Plant Identification class that you can quickly tell an Abies (Fir) from a Picea (Spruce) by trying to roll a needle between your fingers. Fir needles are flat and will not roll. Spruce needles are more cylindrical and will easily roll.

Since the guides include all species grown and sold commercially across the United States and Canada, they include some species you’re unlikely to find at your local tree merchant in New York City, such as Cupressus arizonica, the Arizona Cypress. In addition to the online keys, they have a page for each species, and many links to other information about selecting, identifying, and enjoying your tree.

Related Posts

Brooklyn Mulchfest 2009

Links

Holiday Tree Identification, Brooklyn Botanic Garden
Long Live the Christmas Tree, 2008.12.04, from neighbor and fellow gardener at New York City Garden

Brooklyn Mulchfest 2009

Important updates, 2008.12.23: Good news!

  • You can drop-off trees at Greenwood Cemetery at the 5th Avenue & 25th Street Entrance from 8 am to 4:30 pm daily from January 1 thru 9, and until 2 pm on January 10. Also on January 10, from 10 am to 2 pm on Saturday, a tree chipper will be on site and Master Composters from the Brooklyn Compost Project will be available to answer all your composting questions.
  • The Department of Sanitation will collect clean Christmas trees left at the curb for composting starting Monday, January 5 through Friday, January 16. As always, you must remove all lights, ornaments, and stands from your tree before setting it out at the curb for collection.


Me loading a tree onto a truck during Mulchfest 2008.
Loading the Truck

I know I just got my tree up yesterday, and it’s not even decorated yet, but it’s also time to think about where your tree will go when you’re done enjoying it.

Saturday and Sunday, January 10 & 11, 2009, from 10am to 2pm, you can bring your tree to multiple Parks locations throughout the city. This map shows all the Brooklyn locations for Mulchfest 2009. On-site chipping locations are indicated by the green tree icons. Drop-off only locations are indicated by the arrow&star icons. Be sure to first remove all lights, ornaments, decorations, tree-stands and what-not before turning your tree into mulch.


View Larger Map

This year’s locations are almost the same as last year’s. New this year is a drop-off location at the Brooklyn Bear’s Pacific Street Garden.

A few drop-off locations were lost this year, including Dr. Martin Luther King, Jr. Park, Shore Road Park, and Bensonhurst Park. Greenwood Cemetery, which provided extended drop-off dates last year, is not listed at all this year. And there is no curbside pickup this year. You must take your tree to one of the drop-off or chipping locations.

The closest location to Flatbush is Park Circle, at the corner of Prospect Park Southwest and Parkside Avenue. To volunteer or for more information call (718) 965-8960 or email volunteers@prospectpark.org. I volunteered at last year’s Mulchfest and it was a lot of fun.

Related Posts

Other Mulchfest posts
My photos from last year’s Park Circle Mulchfest [Flickr set]

Links

Mulchfest, Parks